


Genesis Atomizer Coiling Guide
We felt we should include this “Know How” Guide as we’ve had many calls about this. Many of you will agree, building your first electronic cigarette rebuildable atomizer is a pain.
You spend hours, even days watching reviews and taking notes - seeing how easily the tutorial oxidizes the wick and wire, setting the genesis style atomizer up, applying the e liquid, then presses the fire button and shows off their evenly glowing coil atomizer ready to vape - only to find something somewhere along the way has not quite gone right for you.
We’ve all been there, racking our brains as to what element of the process you followed so meticulously has failed you.
My first genesis style rba took 4 hours to setup properly! I’m a perfectionist.
You can only imagine the frustration I went through - unless of course you are in exactly the same boat - then you'll no doubt know where I am coming from.
I recall someone once said when I was an amateur vaper, "before attempting to build your genesis Atomizer, make sure you have another one all ready to use during the setup"
This couldn’t be closer to the truth, or so I thought at the time....
I will explain the small points normally not mentioned in the online tutorial videos to help eliminate common problems that occur.
Should you encounter any problems not mentioned in this guide - please contact me directly and we will take it step by step on the phone - and I will update the guide accordingly.
Step 1: CHECKLIST
Have the following home tools close at hand:
- A Lighter
- A Screwdriver
- Wire Cutters
- A Paperclip
- An Awl or similar fine pointed tool

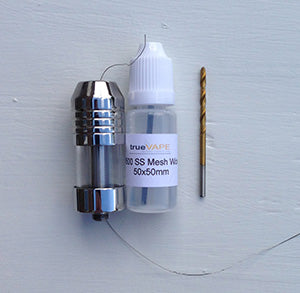
The following items a required for building the Genesis Style Atomizer
- Gensis Atomizer
- A pre-oxidized and primed stainless steel mesh wick
- Kanthal wire for the coil
- Drill bit
Step 2: PREPARE THE WICK
The first thing we need to do is prepare the wick and make sure it fits comfortably in the Atomizer wick hole. Follow my instructions below:
- Straighten out the paperclip completely
- Remove the wick from the bottle of VG and insert it on to the paperclip
- Using the lighter, hold one end of the paper clip and burn all VG off the wick (If it lights on fire, leave it until the fire goes out)
- A Your wick is now ready for use.
Insert the dry wick into the Gensis Atomizer wick hole to make sure it fits. If the wick is to wide do the following:
- using your thumbs and fore fingers starting at the center of the wick, roll the wick through your thumbs and fingers using reasonable pressure outwards. This will tighten the roll and reduce the diameter.
- Test the wick in the wick hole again
- Repeat if neccessary
Once you have the wick fitting comfortable in the wick hole, remove the wick and set it aside somewhere safe for now. We will come back to it later.
Step 3: MAKE THE COIL
The following items are neccessary for this step:
- Taking the drill bit and the wire
- (I reccommend Kanthal AWG 29, explained why here)
- Place one end of the wire on the drill bit and hold it down with your thumb
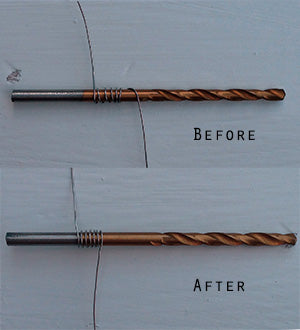
- Wrap as tightly as you can 5/6 Wraps (1.0 ohm), 6/7 Wraps (1.3 ohm) or 7/8 wraps (1.5 ohm)
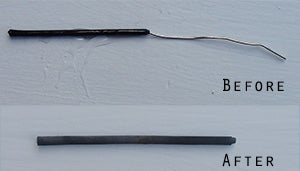
The result will end up with this.
Once you have the wick fitting comfortable in the wick hole, remove the wick and set it aside somewhere safe for now. We will come back to it later.
- To neaten the coil to look like the "After" picture - using your thumb and forefinger, pinch the coil horizontally together moving your thumb and finger forwards and backwards.
- Finally using an Awl or similar sharp pointed device even out the spaces in between the coils.
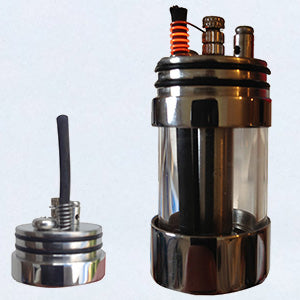
Step 4: ASSEMBLING THE COIL
NOTE:
Prior to this step, make sure the center post nuts are the right way round.
The nuts have two surfaces. One side is indented, the other flat.
Make sure the flat side is used to clamp the wire
-
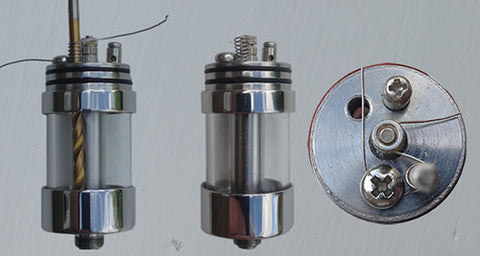
- Insert the drill bit into the Gensis Atomizer wick hole like in the above picture
- The lower end of the wire should be resting against the screw and the upper end by the center post
- Using the diagram on the right of the picture connect the wires as shown.
- You can wrap the top wire around the center post twice if you wish. Make sure you tighten the wire as tight as possible
-
- NOTE:The screw on the Gensis Atomizer is large and can sometimes touch the wire. Make sure this doesnt happen or a short will occure.
- Make sure the wire follows the same pattern as the diagram after connecting the wire ends to the screw and center post
- Using the wire cutter, clip the excees wire off and remove the drill bit by twisting it anti clock wise out.
- You will end up with something like the middle picture above. You are now ready to insert the wick
- We have now setup the wick and wire.
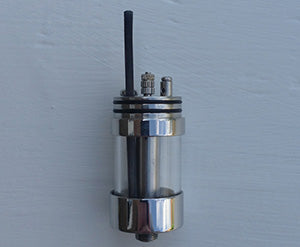
Step 5: TESTING THE COIL
- Insert the wick through the coil and down the wick hole, leaving a 1mm gap at the bottom - this is to allow the juice to funnel up the wick like a straw
- Using the wire cutters or scissors, cut the wick so it is in line with the centre post - you do not want the cap to touch the wick
- Setting your battery between 2.9 - 3.2 volts, test fire your Genesis Atomizer and check for hot spots.
- The above picture illustrates coil 3 as a hot spot as it glows more than the others.
- You can either use the Awl to gently move the wire into a better position, or twist the wick to reduce the hotspots.
- If you’re an amateur and yours is looking something like this - you’re good to go.
TROUBLESHOOTING CHECKLIST
- CHECK YOUR VOLTAGE - shorts occur if your voltage is too high
- Make sure the coil is not touching the screw or the center post - only the coil ends should be
- If your using a homemade wick, make sure it is oxidized properly.
- A fully oxidized wick should not conduct electricity and can be tested for this with a multi meter.
- Using the positive and negative leads check for continuity across the wick. If a noise occurs, it is not oxidized.
- There are methods to oxidize a wick using the coil that are not covered in this guide - there is the option to purchase one of our pre-made wicks here.
- Other problems can occur if the coil is wrapped too tight around the wick, or not evenly positioned around the wick - our method here, will have eliminated this problem as we used the drill bit for the shape of the coil.
Step 6: CHECK THE RESISTANCE
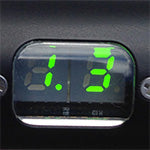
1.3 ohms as we expected!
PLEASE NOTEIf you are not using a mechanical mod or high performance Variable Voltage mod like the Provari, 1.3 ohms will not be reliable.
You should aim to get 1.4 - 1.5 to get the best vape.
Step 7: ADDING THE E-LIQUID
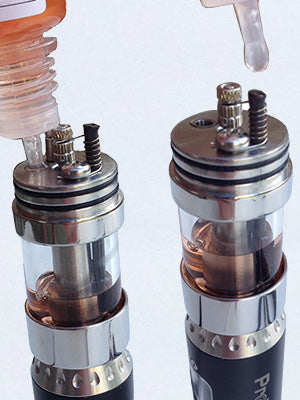
- Fill the tank through the fill hole
- Add a couple of drops directly on the wick. We use our own brand of e liquid found here.
Step 8: VAPE AWAY
A fews additional things to take NOTE of:
- It will take at least 1ml of e-liquid to get the AGA-T2 running at optimum - it's a new wick which requires running in.
- If you are suffering wicking issues, remove the fill screw and leave it out permanently.
- Depending on the e-liquid you use the coil could last 3 days to 2 weeks
- The wick can be washed and reused until it begins to disintegrate - this can take 1- 2 months
AND THATS IT!
once you are familiar with this process, this will take you no more than 5 minutes to do.
However, Please feel free to contact me if you would like to contribute to anything I have already or have not said, or if you require further assistance.
Good luck and I am here to help. For more information and guides check out our main page